


Carcosa, Atropos, the Gungeon — for any fan of bullet‑hell rogue‑lites, they’re all fancy names for a shifting playground of pain, where death is one of two constants. Whether you’re new to the genre or a seasoned veteran, getting a handle on the various mechanics and twists that Housemarque’s Saros offers can take time. But remember the second constant: Death is never the end. Here’s how to survive the early hours of Carcosa — and perhaps even bend it to your will.
🎯 Quick Overview: These 15 tips cover movement, combat, weapons, perks, rerolls, the Armor Matrix, Nightmare Strands, and knowing when to push forward — or when to quit. Master these, and Carcosa will start to feel like home.
1. 🗺️ Check Your Minimap
As ridiculous as it sounds, the minimap can be invaluable. Certain sections spawn enemies out of nowhere, sometimes sneaking up on you. The music’s high tempo is enough to indicate ongoing combat, but the minimap shows their exact position, giving you those few crucial seconds to reposition and maybe avoid a few projectiles. It’s even useful in areas with lots of elevation and cover — if for nothing else than knowing your relative distance from threats.
2. 🪢 Grapple Frames
Shield broken, dash on cooldown, nowhere to run or hide — what is a lone Soltari enforcer to do? Grapple, naturally. Once you unlock it by the third biome, the grapple becomes one of the most hilarious ways to cheat death. That’s because during the animation, you’re completely invulnerable, letting you pass through projectiles and suffer no damage. Whether you’re repositioning or just trying to survive, start grappling.

3. 🔥 DoT and Power Generator Perks
It may seem like choosing the highest Proficiency weapon is ideal — and that’s usually the case — but some perks are clearly better than others, especially damage over time. Razor Edge (saw‑based and crossbow weapons), Incendiary Rounds (shotguns), and the Dispiritor Power weapon are the most notable examples. The best part? You don’t have to constantly shoot — you can focus on dodging or shielding while their health whittles away.
Of course, you’ll also want weapons with the Power Generator perk, which charges your Power meter by simply dealing damage — meaning more Power weapon usage. Couple that with the Soltari shield and rain destruction on your enemies.
4. 🔍 How to Check Weapon Perks
But how would you know what certain perks can do? Equip a weapon, then press the touchpad to open the map. Navigate to the weapons tab, and you’ll find a loadout screen displaying your Artifacts and weapons. Simply hover over each perk’s icon to learn what it can do. Not the most intuitive method — especially when comparing weapons — but it’s better than nothing.
5. 🏹 Crossbows are King
Your mileage may vary, but crossbows in Saros are simply top‑tier. They come in three varieties:
- Repeater – constantly fires bolts.
- Bifurcator – fires multiple homing bolts (number depends on charge time).
- Impactor – fires a spread of bolts in a straight line after charging.
Alongside significant damage — even without a DoT perk — they don’t need to reload like other weapons. The Repeater Crossbow is especially strong since it can spam bolts constantly at a rapid clip.

6. 📦 More Artifact Slots and Rerolls
Early in the Armor Matrix, you’re kind of just grabbing whatever you can. But as the tree branches out, you’ll have the opportunity to pick up extra Artifact Slots (some costing Halcyon, others Lucenite). This is important because you can’t remove Artifacts from your inventory without reroll currency. While you can find more rerolls or unlock upgrades that provide them at the start of a run, they’re also used for rerolling Artifacts, weapons, or Power weapons.
7. 🔄 When to Reroll
As your Proficiency increases, so do your weapons — higher stats, more perks, and better Power (which affects your shield). But you may not always enjoy certain choices, even if they’re higher Proficiency. That’s where rerolls come in.
Pro tip: Try hanging on to your rerolls before the next enemy wave, since there are often several weapons to choose from at that point. Just try not to spend them all before then.
8. 🧩 Armor Matrix – Follow the Twinkle
When the Armor Matrix begins to open up, you probably just want to grab whatever unlocks are available rather than over‑strategising. Instead of checking every potential node, look for those that periodically twinkle. You can even zoom out and see them from afar, making it much easier to navigate to the next available node.

9. 🌑 Enter the Nightmare
Upon progressing further through the story, optional high‑difficulty areas called Nightmare Strands will emerge. These carry a hefty number of enemies and also have a negative modifier separate from whatever you’ve enabled. So if you didn’t enable enemies to spawn projectiles on death and it’s present in a Nightmare Strand, it will be enabled in that instance.
What are the benefits? Aside from the Lucenite they provide, they’re rife with other rewards — including the most notable: replenishing your Second Chance.
10. ❌ No Third Chance
If you haven’t used Second Chance, completing a Nightmare Strand won’t give you another charge (no Third Chance here). More importantly, if you’ve turned off Second Chance in the Carcosan Modifiers, you won’t get one from completing a Strand either. So weigh the pros and cons before diving in.
11. ⏸️ When to Quit a Run (and When Not To)
Being able to suspend a run by quitting is a very welcome addition — but there are caveats. If you try quitting during an enemy fight to game the system, you’ll be sent back to the starting area, and worse, all non‑permanent progression (Lucenite) is lost. Use it wisely — only quit when you’re safe and need a break.
12. 🏃 Running Man – Marathon Runs
When Housemarque mentioned returning to The Passage after slaying a biome enemy, I assumed that meant no more marathoning. Good news: you still can (except during major story moments). Be warned that there’s no way to double back to some teleporters past a certain point — so you really have to commit.
The upside: your weapon retains its Proficiency and perks, making it easier to slaughter enemies and farm Lucenite. The downside: you’ll likely run out of rerolls, making it impossible to pick up every worthwhile Artifact. Plus, if you die without completing the biome and its enemy, the death penalty will be severe — undercutting your Lucenite haul.
13. ⚡ Effectively Parrying Nova Projectiles
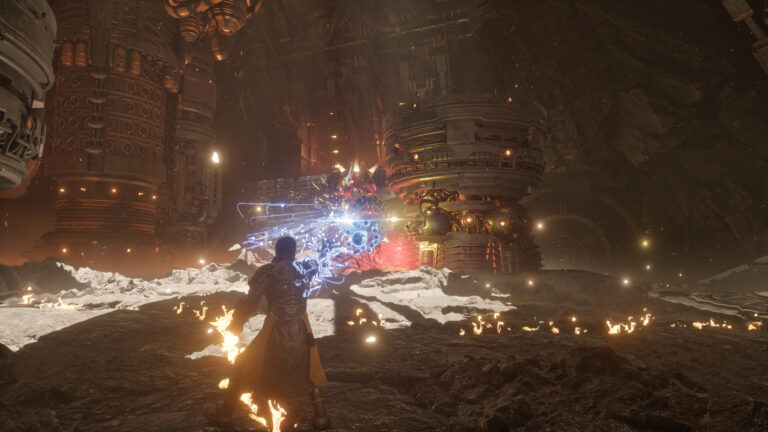
You’d think that waiting for the attack and parrying is best — but it’s trickier in Saros, especially since Nova projectiles (red bullets) have different speeds, elevations, and trajectories.
One method that works: dash straight into the Nova projectile and mash the melee button at the same time. It still requires timing, but I’ve had far more success with this than simply standing and waiting.
14. 🛡️ What You Can’t Parry (or Shield Against)
Despite having Nova properties, you can’t parry red beams — they’re not projectiles. Similarly, you can’t shield against energy patterns like rings or swipes. They’ll break your shield, resetting your accumulated Power and triggering a short cooldown before you can activate it again — leaving you exposed to more damage.
15. 🔁 Revisit Previous Biomes With New Abilities
Whenever you unlock a new ability — like the grapple — revisit previous biomes to explore other paths. Besides granting more opportunities to farm Lucenite and Halcyon (which is especially valuable if you hit a wall), you’ll discover audio logs, holo‑logs, and text logs that provide more context on what’s happened in Carcosa.
💡 Final Survival Tips:
→ Check your minimap constantly — it’s your early‑warning system.
→ Grapple is invincibility — use it to dodge through otherwise unavoidable attacks.
→ Crossbows + DoT perks = a winning combo in the early game.
→ Don’t hoard rerolls — but don’t blow them all before the next weapon drop.
→ Nightmare Strands are high‑risk, high‑reward — go in prepared.
→ Revisit old biomes with new abilities — they’re not just for farming, they’re for lore too.
Carcosa is a harsh place, but with these tips, you’ll survive the early hours — and maybe even start to enjoy the chaos. 🧠🔫
That’s our complete early‑game survival guide for Saros. Master these 15 tips, and you’ll turn Carcosa’s shifting nightmare into your own personal playground. Now get out there, Soltari — and remember, death is never the end.
Related posts:
 EA Sports UFC 6 Guide – Master Transitions and Dominate the Ground Game
 Crimson Desert Guide – How to Earn Money Fast
 SAROS Guide – Where to Get Halcyon
 LEGO Batman 4: Legacy of The Dark Knight Guide – How to Farm Studs Fast and Easy
 Assassin’s Creed 4 Black Flag Resynced Guide – All Legendary Outfits and How to Find Them
 EA Sports UFC 6 Guide – Master Striking and Defense Like a True Stand-Up Warrior
 Crimson Desert Guide – How to Unlock All Elemental Skills
 Forza Horizon 6 – All Aftermarket Car Spawn Locations and Complete Car List